Communicate with a Server via SFTP using Python
A Step by Step Guide to a Complicated Process

If you enjoy automating things in python, you are going to need to know how to upload and download files from a server. SFTP (Secure Shell File Transfer Protocol) has replaced the less secure FTP almost everywhere. This is great for the enhanced security, but it adds a layer of complexity when scripting the process. In fact, the python code that we end up with is just a couple lines long, but there is a bit of work to do in order to get there.
The first thing to do is sign up for some web space. I am going to recommend IONOS. The package I chose is ‘Business’ and it cost £1 for the year, you also get a free domain for the first year too. So if you make sure not to sign up for any extras and you cancel before the year is up, it’s going to cost you a total of £1. Also it’s a well known Web Hosting Service and is one of the most reliable and fastest we have in the UK. Affiliate Link.
If you go to the ‘Hosting’ section of your IONOS account and choose ‘Manage FTP Accounts’ (other Web Hosts will be similar), you can set up a new user. Once you’ve done that you will get a screen like this:
Server / Host: access*****.webspace-data.io
Port:22
Protocol: SFTP
User name: *****
Password: *****
Personal note: Main user for SFTP and SSH
Directory: /.
Your screen won’t contain any *****, that’s just to protect the innocent. Our script is going to need the host name, the username and the password, so copy and paste them into your script and assign them to variable names.
The next step is to download an FTP manager to make the initial connection with your server and to download the public SSH key. This might seem strange since our aim is to script the process in Python, but it is by far the easiest way to download the SSH key. I used Filezilla to do this.
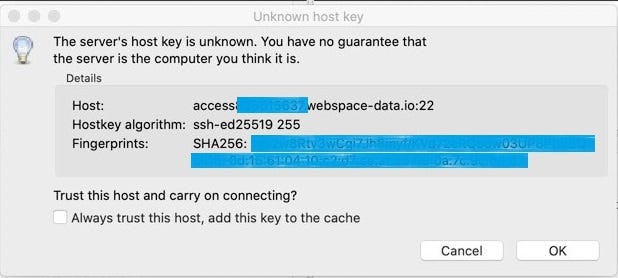
Just under the toolbar in Filezilla are a series of input boxes, fill in your hostname, username and password and click the ‘QuickConnect’ button. You will be presented with this alert box:

Once you have clicked ‘OK’ this SSH key will be available to you, but you need to extract it from system files via the terminal (or PowerShell for Windows users). Follow these steps to set up a keyfile to use in our Python script.
- Type
ssh-keyscan<hostname>in the terminal window and you’ll be given all the saved keys for this host. The key you are looking for will be of the format:<hostname> ssh-rsa <very long string>. - Copy this key to the clipboard
- Navigate to your project directory in the terminal using
cd <directoryName>to go forward through the tree, andcd ..to go back a level. - For macOS or linux, type
touch keyfilein terminal, or in PowerShell typeNew-Item -ItemType file keyfile - For macOs or linux, type
vi keyfilein terminal, thenpto paste in the key. Then:wqto save and exit. In Powershell typenotepad keyfilewhich will load up the file in the notepad app and allow you to paste and save the file using the mouse and keyboard. - We now have the public ssh key saved in our project directory, but before coming out of the terminal, we will install the only python module needed for the project by typing
pip install pysftp
After all that, it’s time to open up the IDE of your choice and bring all of this work together.
Here we define the location of a file we want to upload to our server, we pass our keyfile into the CnOpts() (connection options), we make the connection using the information given to us by the Web Host, and finally we use the pysftp function, put(path/local_file, path/server_file) to upload the file to our server. The get() function is practically the same as put(), just the other way around as seen in the example above.
These are just 2 of the most common functions using pysftp, but there are many more, which you can read about here.
If this article has been useful to you, please let me know in the comments.


